Test Cases
You can also create new test plans, test scenarios under test plan and test cases linked to test scenarios in KTern. While creating them, you can assign the modules to which they belong, the type of testing, priority and stakeholders as well. The workflow management is taken care by KTern while we perform any action on the test case, thereby enhancing the collaboration among the project stakeholders.
Creating a Test Case
To create a Test Scenario, perform the following steps
-
Click on ‘Create New’ button present in the Test Catalog.
-
Clicking on that button, you will be provided with options – Test Plan, Test Scenario and Test Case. Choose Test Case.
-
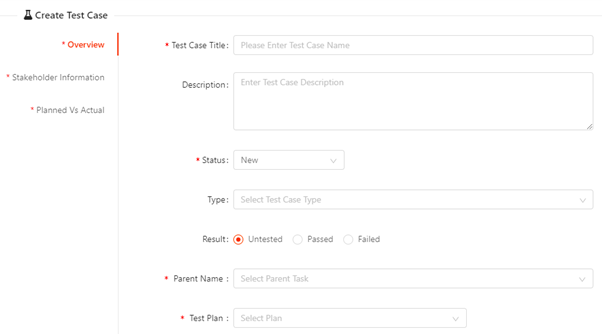
Now ‘Create Test Case’ drawer will be opened as shown below:
-
Fill the form as instructed below:
-
Overview tab:
- Test Case Title: Enter the test case title. This field is mandatory
- Description: Enter the description. This field is optional.
- Status: Choose the Status – New, Active, Performed, Approved. This field is mandatory.
- New: if the test case is about to start
- Active: if the test case is started
- Performed: if the test case is tested
- Approved: if the test case is approved by the stakeholder
- Type: Choose the Test Case type – Interface testing, Integration testing, User acceptance testing, Unit testing, Security testing, Smoke testing. This field is optional.
- Result: Choose the test case result – Untested, Passed or failed. This field is mandatory.
- Parent name: Choose the Parent name under which this new issue is to be linked up with. You can search for the Task ID / Task title. Since KTern.AI follows strict Activate methodology, you require to link the new task with any of the activate tasks. This field is mandatory.
- Test Plan: Choose the Test Plan under which the new test case has to be linked with. This field is mandatory.
- Test Scenario: Choose the Test Scenario under which the test case has to be linked with. This field is mandatory
- Priority: Choose the Priority. This field is optional.
-
Stakeholder Information:
- You can add as many stakeholders as you want against the test case.
- If you need to add new stakeholder, just click on ‘Add new Stakeholder’
-
Planned vs Actual:
- On selecting the Planned vs Actual tab, you can see as shown below:

- Select the planned start date of the task. This field is mandatory.
- Only is the planned start date is selected, the planned end date field will be enabled. This field is also mandatory.
- On selecting the Planned vs Actual tab, you can see as shown below:
-
Editing the Test Case
- Browse through the test catalog and click ‘i’ icon against the respective test case.
- Clicking on the button, the Update Test case < test case title > drawer is opened.
- You can update the edit case.
- Click on Submit button to save the changes.
Deleting the Test Case
- Browse through the test catalog and click ‘i’ icon against the respective test case.
- Clicking on the button, the Update Test case < test case title > drawer is opened.
- In the header section of the drawer, click on Delete icon to delete the test case.