Creating a Task
To create a task in KTern.AI, perform the following operation:
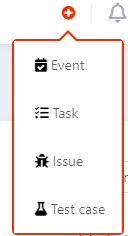
- If you are logged in within a Project, you can see a plus icon on the top bar as shown below:

- Clicking on the plus icon, you will get the list of work item options – Task, Issue, Test Case and Event. Click on Task option.
- Clicking on ‘Task’ option, the drawer will be opened to create a task as shown below:
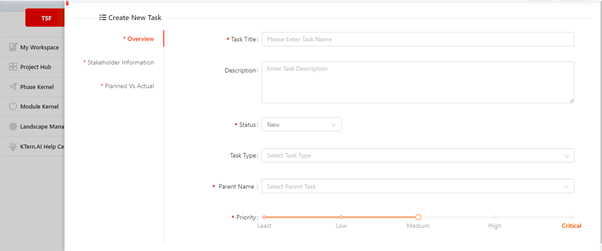
- You can see three tabs in the ‘Create New Task’ drawer. They are overview, stakeholder information and Planned vs Actual.

-
Overview tab:
- Task title: Enter a task title. Task title can be short limited to 50 characters and non-ambiguous. This field is mandatory.
- Description: You can explain about the task in detail. This field is optional.
- Status: Select the status of the task 1. New: if the task is new and about to start 2. Active: if the task activity is started and processing 3. Completed: if the task activity is completed. 4. Approved: if the task is approved by the respective stakeholder. This field will be displayed based on the Project configuration (if you have enabled ‘work items to be approved by the stakeholder).
- Task type: Choose the task type from the options – Data, configuration, Development, Custom Code, Others. This field is optional. You can select multiple options.
- Parent Task: Choose the Parent task under which this new task is to be linked up with. You can search for the Task ID / Task title. Since KTern.AI follows strict Activate methodology, you require to link the new task with any of the activate tasks.
- Priority: Choose the priority of the task. This field is mandatory. We recommend choosing options based on the following scenarios:
- Least: If the task is ambiguous
- Low: If the task is unimportant, non-ambiguous and not urgent
- Medium: If the task is important and not urgent
- High: If the task is unimportant and urgent
- Critical: If the task is both important and urgent
-
Stakeholder Information:
-
On selecting the stakeholder information tab, you can see the following screen:
-
Choose the main stakeholder who is responsible for the task completion using ‘Assigned to’ option.
-
You can also select the other stakeholders who can contribute to completing this task using ‘Participants’ options. You can select multiple participants.
-
-
Planned vs Actual
-
On selecting the Planned vs Actual tab, you can see as shown below:

-
Select the planned start date of the task. This field is mandatory.
-
Only is the planned start date is selected, the planned end date field will be enabled. This field is also mandatory.
-
-
On filling the fields, the Submit button on the top right corner will be enabled. You can click on Submit button to create a new task.
-
If the task is created successfully, you can see the toaster below:
