Project Timeline
Timeline in the Project Hub is a place where users can add and edit tasks in the auto-generated project plan. Users can also link these newly created tasks to their predecessor tasks and create dependencies between tasks.
The workbook is a view similar to excel sheet where all the tasks are listed within their respective phase, work package, status and planned and actual dates. This workbook is meant for adding, assigning and updating the status of tasks easily.
In addition, you can also create milestones for phase closures and sign-offs within this section. A milestone can be a billable or a non-billable milestone.
Update Project Plan
To update the project plan, there are 2 options:
- Timeline - Simulation
- Timeline - Workbook
Simulation
Visit the “Timeline – Simulation” using the following menu option: “Project Hub -> Timeline -> Simulation”.
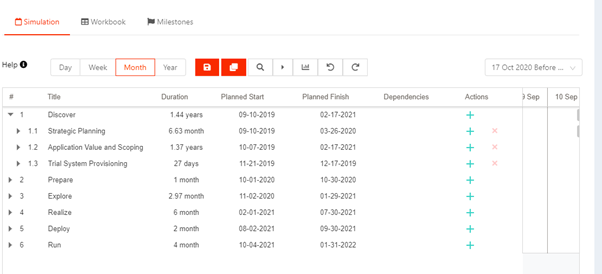
The Planner allows you to simulate your project tasks by modifying the duration and start dates. Based on the Project Calendar, KTern will automatically simulate your project
-
Add / Delete New Item - Click on ‘+’ to add a new item, ‘X’ to delete an item.
-
Indent / Outdent - Click and Drag an item into a desired item to indent, Drag out an item to outdent.
-
Dependencies - The planner allows linked items to create dependencies for a task, Enter the WBS of a task in the Dependencies column.
-
Finish - to – Start (FS) (default) - Task 1 must finish before Task 2 can start. E.g., 1.1.1FS
-
Start - to – Start (SS) - Task 1 and Task 2 must start at the same time. Eg.1.1.1SS
-
Finish - to – Finish (FF) - Task 1 and Task 2 must finish at the same time. Eg.1.1.1FF
-
Start - to – Finish (SF) - Task 2 cannot finish until the start of Task 1. Eg.1.1.1SF
-
-
Multiple Dependencies - You can add multiple dependencies to a task item by comma separated values. Eg.1.1.1SS,1.1.2FS
-
Add Lead / Lag - You can add lead / lag by specifying the day count.
-
Lead - Lead time is the amount of time whereby a successor activity can be advanced with respect to a predecessor activity. E.g., 1.1.1FS-1
-
Lag - A lag time is the amount of time whereby a successor activity is required to be delayed with respect to a predecessor activity. Eg.1.1.1FS+1
-
-
On editing the Plan, click on button present in the top toolbar.

Workbook
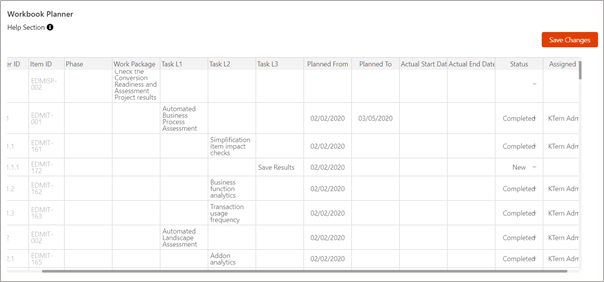
You can edit the Timeline using Workbook view also. The user can edit the plan as if the plan is presented in Spreadsheet view.
Visit the “Timeline – Workbook” using the following menu option: “Project Hub -> Timeline -> Workbook”.
The Workbook allows you to add / edit / remove tasks just like in an excel.
Add -> Insert a new row and add the necessary item in the project plan.
Update -> Click on the data cell to update the corresponding data.
Delete -> Delete the existing row to remove the corresponding item from the project plan.
Key Points
-
Status / Owner for Phases and Workpackages - You cannot assign status or owners to Activate Phases and Work packages
-
One Task per row- Please make sure that there is only one task item per row, Multiple Task Names in a single row will throw an error message.
You can insert rows/columns by left clicking against the respective row/column.
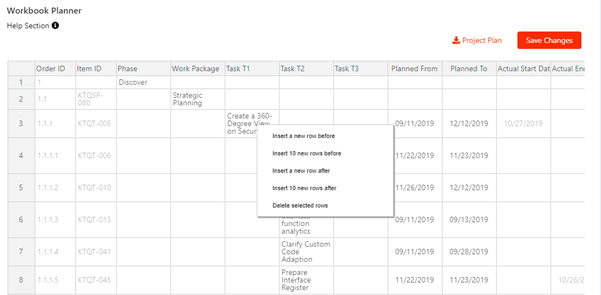
If you need to download Excel Project Timeline template, click on ‘Download Project Plan’ button.