Project Creation
Before you begin
You should be a KTern.AI administrator (i.e. someone with the Administer global permission). Many of the tasks involved can only be performed by a KTern.AI administrator, such as creating a project, modifying a workflow, etc.
The topics in this section cover the activities that you will need to do when configuring a project:
Steps involved in creating a new Project
Consider the following steps to get started with the project creation:
-
Login using the credentials.
-
Upon successful login, you will be taken to Home – Project Launchpad screen as shown below:

-
If you are an Administrator, you will be able to see ‘Create Project’ button.

-
On clicking ‘Create Project’ button, you will be landed to Create Project Wizard as shown below:
-
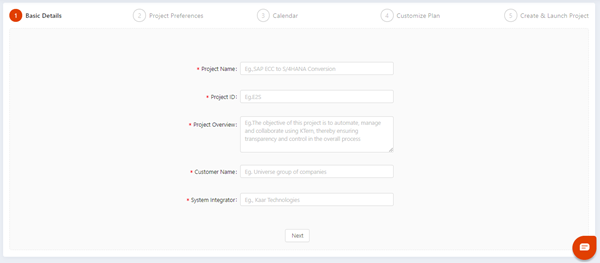
Basic Details: This page allows the administrators to input the basic details of the project.
-
Project Name: Enter a project name which is meaningful and understandable by the users. KTern.AI recommends naming your project with unique name to avoid ambiguity among users. However, KTern.AI maintains unique set of meta information about a project to identify even if redundant project names are associated with an organization. This field is mandatory.
-
Project ID: Project ID is a user-defined and user-friendly identifier of a Project in KTern.AI. Project ID is the unique ID for the project which will be used as a prefix for all the IDs of the work items in the project. It should contain 3 alpha-numeric characters. This field is mandatory.
-
Project Overview: Enter a short description about the Project. This description will help a new user invited to get an overview about that project. Project Overview should contain between 10 and 100 characters. This field is mandatory.
-
Customer Name: Enter the Customer Name. The customer name is the name of the Enterprise/Organization in which the Digital Transformation project to be implemented. This field is mandatory.
-
System Integrator Name: The System Integrator name is the name of the Partner Organization which helps the customer organization to implement Digital Transformation. This field is mandatory.
-
-
Click Next button to input Project Preferences information as shown below.
-
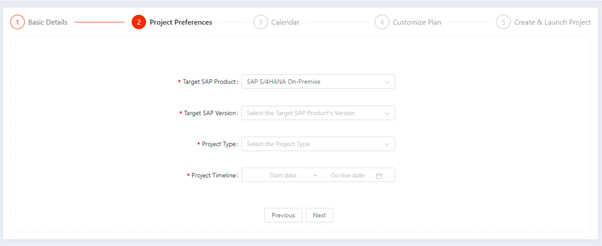
Project Preferences: This page allows the user to create Digital Transformation project templates.
-
Target SAP Product: Select the target SAP Product. The target SAP Product is the name of the SAP product to be implemented as a part of Digital Transformation project. This field is mandatory.
-
Target SAP Version: Select the target SAP Product version. For example: If the target SAP Product selected is SAP S/4HANA On-Premises, then the corresponding versions such as 2020, 1909, 1809 will be available as options of this field. This field is mandatory. The version is useful in automation and SAP Activate based project timeline.
-
Project Type: Select the Project Type. Project type can be any one of the following – Implementation, Conversion and Selective Data Transition. This field is mandatory.
-
Project Timeline: Select the estimated start date and end date of the Project. This field is mandatory. The work items cannot be planned beyond the project start and end date mentioned here.
-
-
Click Next button to configure Calendar settings of the Project as shown below:

-
Calendar: This page allows you to setup calendar settings for your project. The Standard country-based calendars with national holidays are available as options. The user can select any one of those calendars. On selecting a calendar, you can find the list of National holidays in the right section. You can also remove those national holidays based on your project holiday standards.
Creating a custom Calendar setting:
If the user requires a custom calendar setting, you can create a custom calendar. To do so, perform the following:
- Click on ‘Add new Calendar’ button.

-
On the right section, add Calendar Name. The calendar name is an identifier to denote the custom calendar defined by the user.
-
Choose Project Weekends. This field is multi-select option box. You can select multiple project weekends. Usually, project weekends can be Saturday-Sunday / Friday-Saturday.
-
On completing the calendar settings, click Next button to view the Digital Transformation project automatically created by KTern.AI.
-
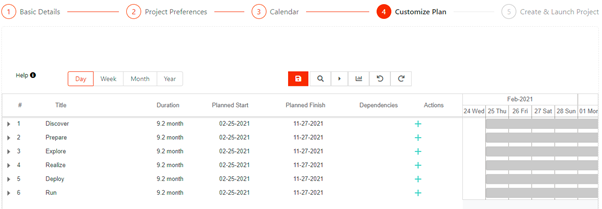
You will be landed to ‘Customize Plan’ tab as shown below:
-
KTern Planner: The Planner allows you to simulate your project tasks by modifying the duration and start dates. Based on the Project Calendar, KTern will automatically simulate your project
- Add / Delete New Item - Click on ‘+’ to add a new item, ‘X’ to delete an item.
- Indent / Outdent - Click and Drag an item into a desired item to indent, Drag out an item to outdent.
- Dependencies - The planner allows linked items to create dependencies for a task, Enter the WBS of a task in the Dependencies column.
- Finish - to – Start (FS) (default) - Task 1 must finish before Task 2 can start. E.g., 1.1.1FS
- Start - to – Start (SS) - Task 1 and Task 2 must start at the same time. Eg.1.1.1SS
- Finish - to – Finish (FF) - Task 1 and Task 2 must finish at the same time. Eg.1.1.1FF
- Start - to – Finish (SF) - Task 2 cannot finish until the start of Task 1. Eg.1.1.1SF
- Multiple Dependencies - You can add multiple dependencies to a task item by comma separated values. Eg.1.1.1SS,1.1.2FS
- Add Lead / Lag - You can add lead / lag by specifying the day count.
- Lead - Lead time is the amount of time whereby a successor activity can be advanced with respect to a predecessor activity. E.g., 1.1.1FS-1
- Lag - A lag time is the amount of time whereby a successor activity is required to be delayed with respect to a predecessor activity. Eg.1.1.1FS+1
-
On editing the Plan, click on button present in the top toolbar.

-
On clicking save and continue button, a popover opens to confirm saving. On clicking OK button, the Next button (at the bottom section) will become enabled.
-
Click ‘Next’ button to move to the next page as shown below:

-
Tick the ‘I agree to the Terms and conditions’ checkbox to enable ‘Create & Launch Project’ button.
-
On clicking the ‘Create & Launch Project’ button, the Project is created, and the user will be taken to My Workspace of the new project created.